Table of Contents
Sharepoint Online
You are able to connect Stages with SharePoint Online. A typical URL to SharePoint Online looks like:
https://companyname.sharepoint.com/
Example Configuration
<cms-type name="sharepointonlinegraph">
    <!-- Global Properties -->
    <cms-host ident="sharepoint.online.ident" name="https://example.sharepoint.com" displayName="SharePoint Online Example">
        <!-- Host Properties -->
        <cms-property name="client.id" value="xxxx-xxxx-xxxx-xxxx-xxxx" />
        <cms-property name="client.secret" value="xxxxxx" />
        <cms-property name="tenant.id" value="xxxx-xxxx-xxxx-xxxx-xxxx" />
        <cms-property name="state.attribute.name" value="_Status" />
        <cms-property name="link.content.type.name" value="Link to a Document" />
    </cms-host>
</cms-type>
Host Properties
These configuration properties affect the behavior of one SharePoint Online server.
* Required
Properties marked with * are required for the adapter to work.
# Required but can also be set in web-application
Properties marked with # are required but can also be set in the File Management section in the Stages web-application as well. The value entered in the web-application overrides the one from the config.xml.
Required but with default
Properties marked with are required, but there is a default value. This values can be overridden by configuring it in the config.xml.
client.id *
- Description: The client id of the stages application, which has to be registered at the Microsoft azure portal website.
- Links: Microsoft Azure Portal
client.secret *
- Description: The client secret, which can be generated after registering the stages application at the Microsoft azure portal website.
- Links: Microsoft Azure Portal
tenant.id *
- Description: The tenant id identifies your company when using Microsoft Services. You can get this id at the Microsoft azure portal website.
- Links: Microsoft Azure Portal
loginserver
- Default Value: https://login.microsoftonline.com/
- Description: The URL to the login server used for OAuth2 authentication. Stages appends /oauth2/v2.0/authorize , to authorize the access. For receiving tokens, /oauth2/v2.0/token will be appended to the login server address.
- Links: More about OAuth
state.attribute.name
- Description: This property specifies a column name, which will be used by stages to store the file status.
document.content.type.name
- Default Value: Document
- Description: Name of the document content type. Sharepoint supports multiple content types but stages only supports the default type for documents.
- Since Stages 7.5.6.2, 7.6.2.4 and 7.7.0.0 it is possible to define multiple content types. Separate them with a #. For example:
<cms-property name="document.content.type.name" value="Document#MyDocument#RuleDocument" />
link.content.type.name
- Default Value: Link to a document
- Description: The second content type which is supported by stages.
- Known Issue: Typo in Default Value. Has to be Link to a Document
- Since Stages 7.5.6.2, 7.6.2.4 and 7.7.0.0 it is possible to define multiple link types. Separate them with a #. For example:
<cms-property name="link.content.type.name" value="Link to a document#My Link to a document#Rule Link to a document" />
use.system.account.for.download
- Default Value: false
- Description: When set to true, files will be downloaded using the system account.
sites.selected.scope (since Stages 7.10.7.0)
- Default Value: false
- Description: When set to true, Stages uses application permission Sites.Selected for system user and Sites.Selected delegated permission for Stages user. Please refer chapter “Application and delegated permission Sites.Selected” for detailed explanation.
Proxy configuration (since Stages 7.10.10.0)
Stages can communicate with SharePoint Online through a proxy. Fill in the proxy.scheme, proxy.hostname and proxy.port host properties to use a proxy. Otherwise no proxy is used.
proxy.scheme
- Default value empty (no proxy)
- Possible values: http, https
- Description: The type of proxy to use.
proxy.hostname
- Default value empty (no proxy)
- Example values: proxy.example.com or 10.1.2.3
- Description: Which proxy host to use.
proxy.port
- Default value empty (no proxy)
- Example values: 3128
- Description: Which proxy port to use.
proxy.username
- Default value is empty (proxy doesn't require authentication).
- Example values: username
- Description: The username to use for authentication on the proxy.
proxy.password
- Default value is empty (proxy doesn't require authentication)
- Example values: secretPassword
- Description: The password to use for authentication on the proxy.
Azure Portal
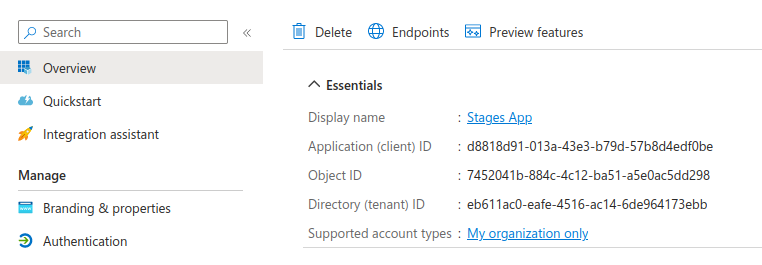
The integration uses Microsoft Graph API. To be able to use the API it is required to register and configure Stages as Azure App.
- Value of “Application (client) ID” is cms-property
client.id - Value of “Directory (tenant) ID” is cms-property
tenant.id
Authentication
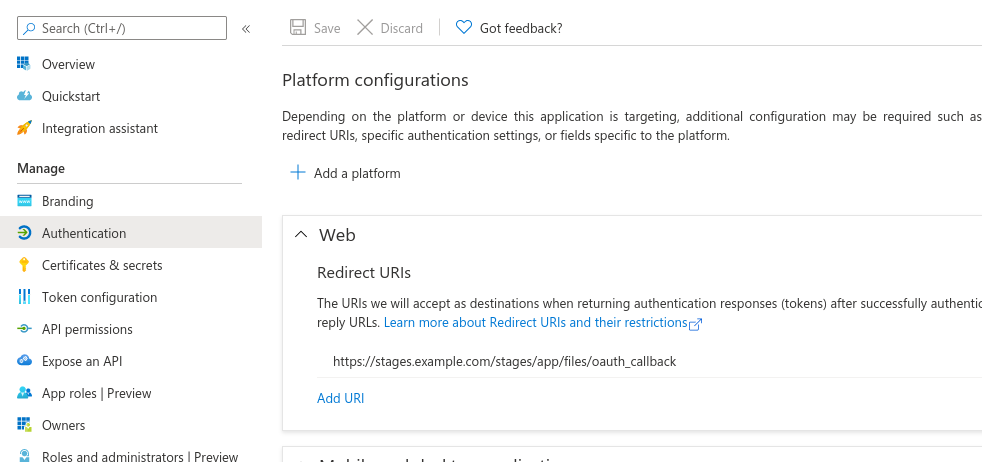
Every application registered at the Microsoft azure portal can register Redirect URIs in the Authentication section of the applications registration page shown in the picture below.
For the authentication process to work, you have to add the following redirect for Web to the list:
https://<stages-hostname>/stages/app/files/oauth_callback
- Microsoft only accepts https expect for testing scenarios on localhost (then http is valid as well)
- Stages-hostname: Hostname of the server, users can access the Stages application. If Stages does not run on standard https port (443) you have to specify it.
Example
If the link to your Stages looks like this
https://stages.example.com/stages/#/workspace/191/_vv/process/process/_h8ijENV8Enq3iqjRPK3spw
then your redirect URI is
https://stages.example.com/stages/app/files/oauth_callback
API Permissions
In addition to the Redirect URIs, the application needs permissions for file handling. Up to Stages version 7.10.6.1 we had the option to use delegated Sites.ReadWrite.All permission. Because of backward compatibility this is the default behavior. With Stages version 7.10.7.0 we added the option to use application and delegated permission Sites.Selected. This is the recommended option. There is a in detail explanation in Microsoft documentation.
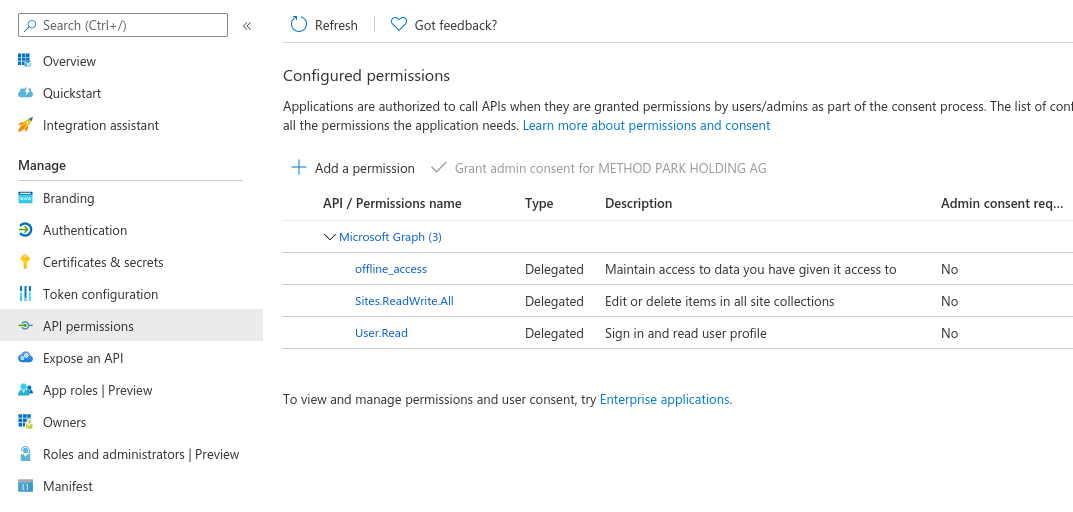
Default option: Delegated permission Sites.ReadWrite.All
On this option Stages act in behalf of the user. The permissions are all of the type delegated:
- offline_access (Microsoft Graph, type delegated)
- User.Read (Microsoft Graph, type delegated)
- Sites.ReadWrite.All (Microsoft Graph, type delegated)
In some cases an admin consent is required. This can be done by a Global Administrator, an Application Administrator, or a Cloud Application Administrator. More information in Azure documentation.
The picture below shows, how this should look like:
Recommended option: Application and delegated permission Sites.Selected (Since Stages 7.10.7.0)
To active this option the setting sites.selected.scope has to be set to true in the xml host properties:
<cms-property name="sites.selected.scope" value="true" />
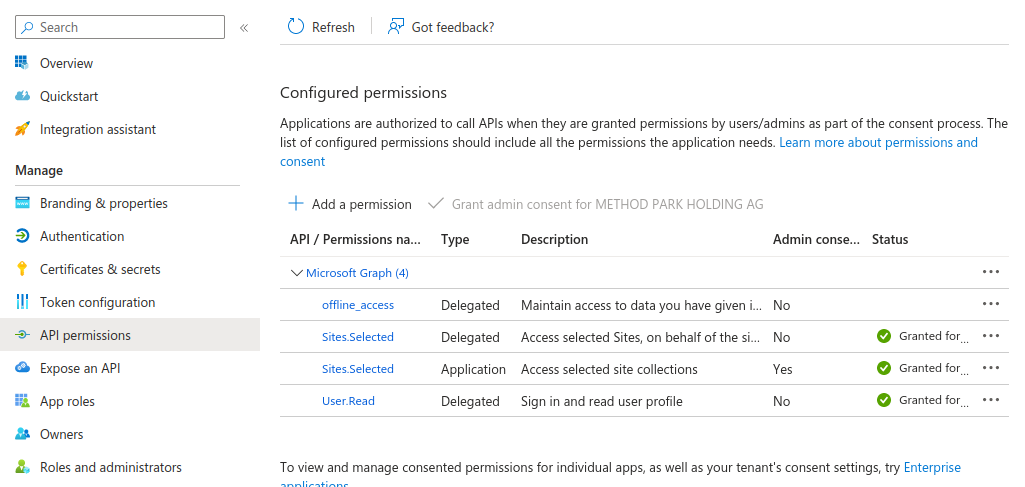
On this option Stages acts with Azure application permission in case it performs action like fill caches. In case a user performs e.g. a file upload action the Azure delegated permission for this user will be used. The used permission is in both cases Sites.Selected.
- offline_access (Microsoft Graph, type delegated)
- User.Read (Microsoft Graph, type delegated)
- Sites.Selected (Microsoft Graph, type delegated)
- Sites.Selected (Microsoft Graph, type application)
The picture below shows, how this should look like:
For this option an admin consent is required. This can be done by a Global Administrator, an Application Administrator, or a Cloud Application Administrator. More information in Azure documentation.
In addition for the Sites.Selected permissions an Global Administrator have to select the specific SharePoint sites and give “write” access. This can be done via PnP PowerShell or Microsoft Graph PowerShell SDK.
PnP PowerShell
The PnP PowerShell offers a command to grant the permission. PnP PowerShell must be installed. The user must be an Azure administrator. In this example we're granting access for Stages app with client ID 11111111-1111-1111-1111-111111111111 to SharePoint Online Site https://example.sharepoint.com/sites/steering.
Grant-PnPAzureADAppSitePermission -AppId "11111111-1111-1111-1111-111111111111" -DisplayName "Stages" -Permissions Write -Site "https://example.sharepoint.com/sites/steering"
Microsoft Graph PowerShell SDK
The Microsoft Graph PowerShell SDK must be installed. The user must be an Azure administrator. In this example we're granting access for Stages app with client ID 11111111-1111-1111-1111-111111111111 to SharePoint Online Site https://example.sharepoint.com/sites/steering.
Please notice that site https://example.sharepoint.com/sites/steering have to be separeted into example.sharepoint.com and /sites/steering and have to be combined again with : as separator: example.sharepoint.com:/sites/steering
Import-Module Microsoft.Graph.Sites

# Connect PowerShell to Azure
Connect-MgGraph

# Find SiteId
$site = Get-MgSite -SiteId "example.sharepoint.com:/sites/steering"

# Write permission for Stages app
$params = @{
    roles               = @("write")
    grantedToIdentities = @(
        @{application = @{
                id          = "11111111-1111-1111-1111-111111111111"
                displayName = "Stages"
            }
        }
    )
}

New-MgSitePermission -SiteId $site.id -BodyParameter $params

# Disconnect PowerShell from Azure
Disconnect-MgGraph
In this PowerShell script this two Microsoft Graph API endpoints are used:
Certificates & secrets
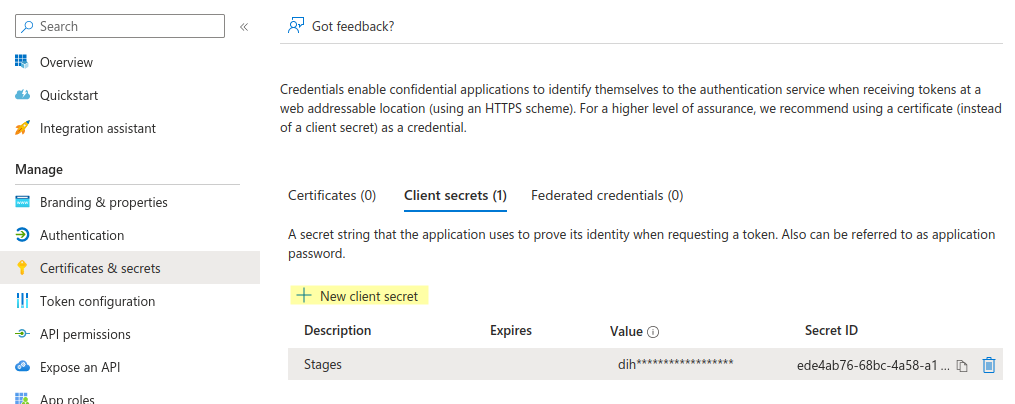
It is required to generate a client secret for Stages. It's recommended to choose expire never or a long duration. If the secret expires it must be changed in Stages and all users have to re-authenticate.
Repository Configuration
Access to SharePoint Online projects can be configured in Stages processes via “Management > File Management > Repositories”. 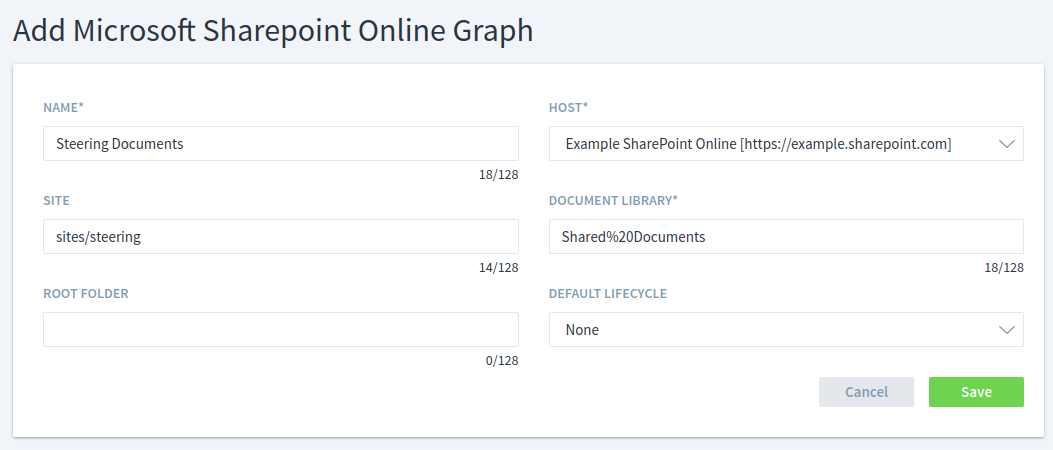
If you go to the document library with your browser you will get a URL like this. We will use it in this example.
https://example.sharepoint.com/sites/steering/Shared Documents/Forms/AllItems.aspx
Name: The name of this SharePoint Online configuration. This name will be used by Stages to refer to this repository configuration (e.g. in repository plan)
Host: This selection field contains an entry for each cms-host section in the Stages configuration file (config.xml). You can select the host for this repository configuration.
Site: Define a site parameter for this repository configuration. The site is the path to the location, where your document libraries are located on the SharePoint server. The site is one piece for the complete connection string to the SharePoint server. > According to the example URL the site-part is sites/steering
This overwrites the path from the URL entered in the configuration file (config.xml).
Example:
- config.xml: <cms-host name="https://example.sharepoint.com/sites/brake" />
- Value in Site: sites/steering
- Resulting URL: https://example.sharepoint.com/sites/steering
- The path from the config.xml gets overwritten by the value from Repository Path.
Document Library: Defines the name of the document library. The document library is one piece for the complete connection string to the SharePoint server. If your document library contains a space it must be replaced by %20 > According to the example URL the Document Library part is Shared%20Documents
Root Folder: Defines a root folder inside the given document library. Every file linked or uploaded to a repository, which defines a root folder in the configuration, will be inside this root folder.
Default Lifecycle Select a lifecycle from the process metamodel as default for files from this repository.
Known Limitations
Behavior of Lock/Unlock
Currently, the graph API only supports checkin/checkout and no Undo-Checkout. So for every lock/unlock a new version of that file is created in sharepoint online.
Initial commit
Creates two versions (one for the creation of a new file/ second for updating the properties)
Set State
After setting the state of a Sharepoint Online document, the assignment to the Stages user gets lost. The modifier will be the Sharepoint Online user instead of the Stages user.
Major / Minor Version
The Graph API, wich is used by the SharePoint Online Adapter, does currently not support setting major/minor versions when uploading a file.
Action before authentication
If the current user is not authenticated yet and performs an action, the authentication dialog will be opened. After the authentication the user has to performs the action again.
Internet Access
- Stages application technical limitation: Proxy network won’t work to SharePoint online, it will work to direct internet access
- We do not support the indirect route via a proxy. The SharePoint Online integration requires direct access to https://login.microsoftonline.com/ and https://graph.microsoft.com
Troubleshooting
Error AADSTS50011: The reply URL specified in the request does not match the reply URLs configured for the application
Check the Redirect URI in Azure Portal
Unknown certificates
At the moment this public CAs are required:
- DigiCert Global Root CA
- valid until 10 Nov 2031 00:00:00 GMT
- SHA1: A8:98:5D:3A:65:E5:E5:C4:B2:D7:D6:6D:40:C6:DD:2F:B1:9C:54:36
- SHA256: 43:48:A0:E9:44:4C:78:CB:26:5E:05:8D:5E:89:44:B4:D8:4F:96:62:BD:26:DB:25:7F:89:34:A4:43:C
- DigiCert Assured ID Root G2
- Valid unitl: 15 Jan 2038 12:00:00 GMT
- SHA1: A1:4B:48:D9:43:EE:0A:0E:40:90:4F:3C:E0:A4:C0:91:93:51:5D:3F
- SHA256: 7D:05:EB:B6:82:33:9F:8C:94:51:EE:09:4E:EB:FE:FA:79:53:A1:14:ED:B2:F4:49:49:45:2F:AB:7D:2F:C1:85
- Microsoft RSA Root Certificate Authority 2017
- Valid until Fri, 18 Jul 2042 23:00:23 GMT
- SHA1: 73:A5:E6:4A:3B:FF:83:16:FF:0E:DC:CC:61:8A:90:6E:4E:AE:4D:74
- DigiCert Global Root G2
- Valid until Fri, 15 Jan 2038 12:00:00 GMT
- SHA1: DF:3C:24:F9:BF:D6:66:76:1B:26:80:73:FE:06:D1:CC:8D:4F:82:A4
- SHA256: CB:3C:CB:B7:60:31:E5:E0:13:8F:8D:D3:9A:23:F9:DE:47:FF:C3:5E:43:C1:14:4C:EA:27:D4:6A:5A:B1:CB:5F
